Ladurée Patisserie’s La Fraise (French for simply Strawberry) caught my eye two weeks ago, when I was vacationing in London. After interrogating a sales associate with a barrage of questions, I learned that the interior of La Fraise consists of fluffy coconut sponge cake and house-made strawberry compote enrobed in a heavenly strawberry crème mousseline.
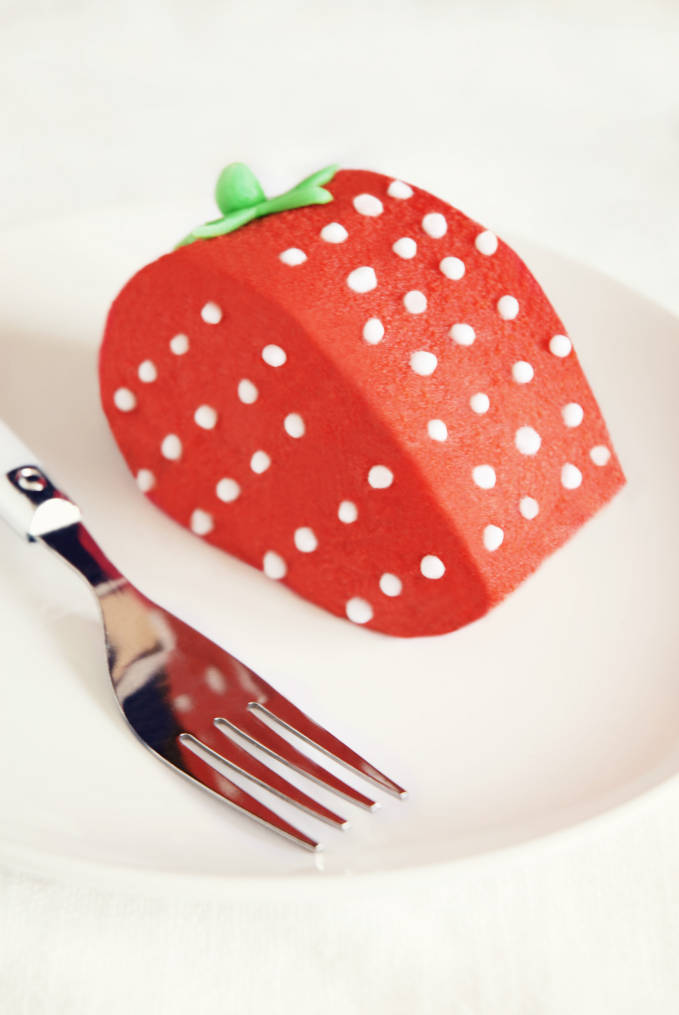
The crème is then covered with strawberry-red dacquoise cake, studded with royal icing “seeds”, and impaled with a gum paste stem before being neatly arranged in rows in the Ladurée display case. Don’t be turned off by the cartoony, almost gimmicky appearance of this eye-catching entremet cake; La Fraise is incredibly tasty.
While Ladurée does have a cookbook full of recipes available for purchase, La Fraise, a seasonal pastry, is not in it. Even worse, absolutely no information about the pastry is available on their website—not even a list of components like they have for everything else that they sell. I emailed them twice about the omission, partly hoping I guess that they would not only post a photo of the pastry but also a detailed recipe on their website. Naturally, Ladurée did not reply to the crazy Canadian food blogger who naively asked for free proprietary information. Still, it was worth a shot. Two, apparently.
Without any information other than what I had gleaned from the woman behind the counter, I was forced to work with a haphazard list of components and the vague recollection that I had of the flavours and textures.
For recipes, I modified base formulas from Antonio Bachour’s Bachour cookbook. While the book has lots of great multi-element combinations (e.g. coffee, hazelnut, and caramel entremet cake and key lime and raspberry tarts), I love it because it contains recipes for so many different individual components. I have been mixing and matching components from the book to create other desserts a lot lately, like for salted caramel and milk chocolate tarts. Bachour’s recipes are stellar, and unfortunately I’m not being paid to say that. Inside of my La Fraise, all of the components were scrumptious.
Unfortunately, however, my homemade version of La Fraise does not look nearly as nice as Ladurée’s. If you search for a photo of La Fraise online, sorting through the photos of actual strawberries that have crawled into the search results, you’ll find that my rendition looks like an absolute mess in comparison to Ladurée’s. Their strawberry stem is elegantly curled, the edges of their cake are crisper, and their royal icing seeds are meticulously arranged in near-perfect rows. Meanwhile, my stem is akin to a blob, the edges of my cake are too curvy, and the seeds are just too big. That’s just the beginning of my list of failures with this cake though.
My problem was that I fell into the trap of thinking that all patisseries and pastry chefs have a common understanding of, and thus similar recipes for, relatively uncommon pastry elements. They don’t.
Case in point, the strawberry crème mousseline that makes up the majority of La Fraise. When I asked around on Twitter what crème mousseline was, I received a few different answers. I was told it was everything from a butter-loaded pastry cream to pastry cream folded into beaten egg whites. What “crème mousseline” actually is doesn’t matter (most sources point to the former definition of a butter-loaded pastry cream). What is important is that I didn’t know what Ladurée’s version of crème mousseline was, which made it hard to replicate without a recipe.
I decided to work from Bachour’s interpretation of crème mousseline. He didn’t have a recipe for a strawberry version, but there was a recipe for a passion fruit variety for one of his cakes. I simply subbed the passion fruit purée for strawberry purée and reduced the amount of sugar, expecting decent results. My results were anything but.
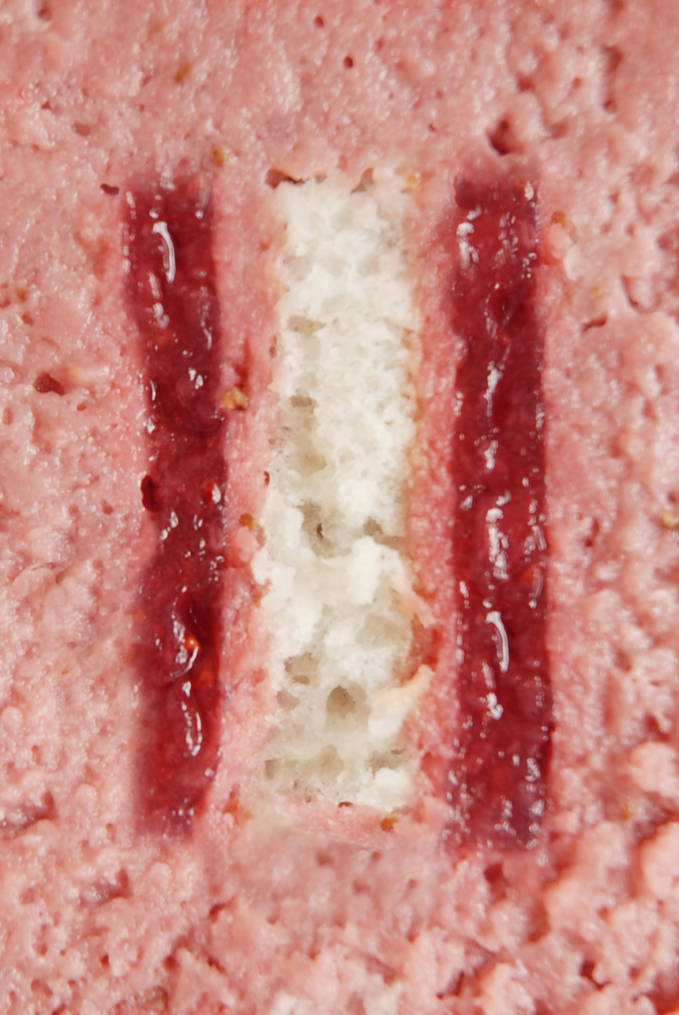
Although the texture my version had was very similar to Ladurée’s (it’s the light pink cream in the above photo), I added too much strawberry purée. I can tell because, when comparing the interior of my pastry to Ladurée’s, my mousseline is far redder. Added strawberry flavour isn’t, by any means, a massive issue. Too much water, as a result of adding too much purée however, is.
After I rolled La Fraise in toasted red dacquoise crumbs (much like I did for the Devil’s Food Cake I made a couple of months ago), the crème mousseline released water into the crumbs. The entire pastry felt wet; nothing like Ladurée’s.
This was a huge problem because it meant that (a) the pastry was difficult to pick up, (b) the edges were not as crisp as I would’ve liked them, (c) the royal icing was hard to pipe on because it kept falling off, and (d) the sugar in the gum paste dissolved and released a liquid down the back of the pastry after being on there for a little while.
You may notice, however, that not a lot of what I just described is visible in the photograph that I posted. Well, my photograph is from a very strategic angle: the back of the pastry is covered in a green liquid from the sugar dissolving in the gum paste and the other side of it is lacking “seeds” because I did not have the patience necessary to continually pipe on royal icing that slid off mere moments later. What you’re seeing is the sole semi-decent angle from the best of six pastries that the recipe made.
Ladurée doesn’t just avoid the issue of too much moisture by using less purée in their crème mousseline. Their pastry cooks also spread a thin layer of white cream over the mousseline before covering it in the red dacquoise cake. That layer of cream, which I skipped because I was unable to identify it, must serve as a water-proof barrier that prevents the dacquoise from getting wet. In hindsight, I shouldn’t have skipped it.
Appearance wise, my version is plain awful in comparison to Ladurée’s. Even without the issue of wet dacquoise crumbs, my piped seeds are sloppy and the strawberry stem I created doesn’t look nearly as nice (partly because I let it dry out on the cake, in a moist environment). The overall shape is a problem too. I used homemade pastry rings fashioned out of flimsy plastic. Ladurée, on the other hand, uses nice, metallic pastry rings. You can’t get great results with subpar equipment.
While my version of La Fraise isn’t jaw-droppingly beautiful like Ladurée’s, I prefer the stronger strawberry flavour in mine due to the addition of more strawberry purée. For next time, I’ll skip the red dacquoise crumbs, royal icing, gum paste stem, and cartoony strawberry shape. Instead, I’ll assemble the coconut sponge, strawberry compote, and strawberry mousseline in a mousse ring and then glaze with a simple white or dark chocolate mirror glaze. Much simpler, much nicer. I suggest you skip the gimicky appearance and do the same.
- 20g ground almonds
- 20g unsweetened, shredded coconut
- 20g flour
- 40c icing sugar
- 25g + 75g egg whites
- 25g sugar
- 125g puréed strawberries
- 50g finely diced strawberries
- 60g sugar
- 5g pectin
- 10g lemon juice
- 21g gelatin
- 75g + 25g water
- 525g puréed strawberries
- 450g half and half (or 225g cream and 225g milk)
- 180g egg yolks
- 40g + 115g sugar
- 8g lemon juice
- 75g cornstarch
- 265g egg whites
- 20g flour
- 60g ground almonds
- 70g icing sugar
- 30g sugar
- 90g egg whites
- Red food colouring (not Wilton gel colours, which turn brown when baked)
- 35g egg whites
- 200g icing sugar
- Green gum paste (gum paste with green food colouring kneaded in)
- Preheat the oven to 180°C (360°F).
- In a small bowl, mix together the almonds, coconut, flour, icing sugar, and 25g of the egg whites until combined.
- In a large bowl, stir together the 75g of egg whites with the 25g of sugar. Whip until stiff peaks form in a stand mixer fitted with a whisk attachment. If you wish, you could also whisk by hand or with a hand mixer but it will take longer.
- Fold the coconut mixture into the egg whites until smooth, trying to deflate the egg whites as little as possible, and then spread evenly onto a parchment paper lined tray (you’re looking for a thickness of about 7.5mm or ⅓ of an inch).
- Bake for 10-15 minutes, or until lightly golden.
- Cut into 4cm (~1.5 inch) squares and store at room temperature in an air-tight container until ready to assemble.
- Line a pan with parchment paper in preparation (I used an 8x8 square pan, although it doesn’t particularly matter).
- In a small bowl, mix together the sugar and the pectin.
- Meanwhile, bring the puréed strawberries with the diced strawberries in a small saucepan to a simmer over medium heat.
- Stir the sugar-pectin mixture, as well as the lemon juice, into the strawberries.
- Bring to a rapid boil and boil for four minutes, stirring regularly.
- Spread evenly onto the parchment paper lined pan (you’re looking for a thickness of about 7.5mm or ⅓ of an inch) and freeze.
- Once frozen, cut into 4cm (~1.5 inch) squares and store in the freezer until ready to assemble.
- In a small bowl, mix together the gelatin and the 75g of water.
- Then, bring the puréed strawberries and half and half to a boil in a medium sized pot.
- Meanwhile, whisk to combine the egg yolks, 40g of sugar, lemon juice, and cornstarch in a large bowl.
- Slowly whisk in the hot cream and strawberry mixture into the eggs.
- Transfer back to the pot and continue to cook, stirring constantly, until thickened.
- Stir in the gelatin and set aside in the fridge to cool for at least an hour.
- Once chilled, whip the egg whites in a stand mixer fitted with a whisk attachment to soft peaks.
- Meanwhile, in a new small pot, combine the 115g of sugar with the 25g of water. Heat over medium heat until the sugar-water mixture reaches 121°C (250°F).
- Slowly pour the liquid sugar into the egg whites, continuing to whip on a low speed until the egg whites reach stiff peaks. If you wish, you can pour in a little bit of sugar, whisk on high speed, and repeat until you use all of the sugar instead of pouring the sugar in a steady stream.
- Whisk the cooled strawberry mixture to remove clumps and then fold into the egg whites until smooth.
- Transfer to a pastry bag with a large tip (shape doesn’t matter).
- If you have 5cm (2 inch) wide acetate strips, you’re ready for the next step. Otherwise, cut transparencies/overhead projector sheets into strips that are 5cm (2 inches) wide. You’ll need 6 strips.
- Curl the strips to get a water drop shape, cutting as necessary and attaching with tape. You’ll be assembling the pastries from their side and then turning them so that they rest on one of the straight edges of the water drop.
- Place the 6 plastic water drop pastry rings on a parchment paper lined baking sheet that fits in your freezer.
- Pipe the strawberry mousseline ¼ of the way up the pastry rings.
- Place a square of frozen strawberry compote in each ring (in the large bottom part of the water drop), add a bit more mousseline, place a square of coconut sponge on top, add some more mousseline, and top with a final square of strawberry compote.
- Cover completely with mousseline and use an offset spatula to ensure that the top is flat.
- Freeze until firm.
- Preheat the oven to 190°C (375°F).
- Sieve together the flour, ground almonds, and icing sugar into a large bowl.
- Combine the egg whites with the sugar in another bowl and whip to medium peaks with a stand mixer fitted with a whisk attachment. Add the red food colouring, as needed, and whip until combined.
- Fold the dry ingredients into the meringue, spread onto a tray lined with parchment paper, and bake for 11-14 minutes. It doesn’t matter much if you under or over bake the cake.
- Once cooled, break up into chunks, place back onto the parchment paper, and bake for about 30 minutes at 90°C (200°F), or until quite hard but not burnt. Check often to ensure that the cake does not burn or turn brown.
- Cool and then grind into fine crumbs with a food processor.
- Sieve into a shallow container to prepare for rolling the pastries in the crumbs.
- Peel away the plastic pastry ring or lift up the metal pastry ring (you may need to heat it up with a flame), and then quickly pass a flame over the mousseline so that the crumbs will stick to it.
- Roll the pastries in the cake crumbs and set aside.
- Then, whip the egg whites until frothy and add the icing sugar. Continue whisking until thickened and transfer to a piping bag with a small, round piping tip.
- Pipe the cream onto the strawberry to form seeds.
- For the stem, cut out 5-point stars from the gum paste and poke a hole in the middle of each with a straw. Make a stem out of gum paste and push it through the hole. Create a small hole in the strawberry-shaped pastry with a knife and insert the stem.
Instead of pursuing the strawberry shape and design (at least with this recipe), I suggest layering the coconut sponge, strawberry compote, and the mousseline in a regular round or square pastry ring, freezing completely, and then coating with a chocolate mirror glaze (the recipe from the Ambroisie cake I made earlier works nicely). You won't get the strawberry shape, but it will taste just as good with far fewer problems. I'm unable to nail down Ladurée's recipe just yet...
That’s really beautiful. What a lot of work! I think I might leave it all to you to make this really elegant treat.
wow its amazing. You really have a gift.
I think you’re being a little too hard on yourself! Your cake looks beautiful, and I’m sure the taste is just as good, if not better, than the original version.
Also, the velvety coating on the original cake reminds me of something I’ve seen on tv, where they spray the cake with cocoa butter or something of that sort.
Cocoa butter? That’s a great idea! I hadn’t even considered that. The lady at Laduree told me it was dacquoise cake.. so maybe some type of combination of the two.
Those measurements seem a bit unconventional to me! But then again, what do eye know.
Hey Jay, which measurements are you referring to?
I love that you emailed La Duree about La Fraise! Cracks me up. This looks sensational! What a crazy amount of work…I might just skip the work and hop on a plane!
That’s not good? I am amazed by what you have done! It looks beautiful to me, similar to Laduree’s, and to know that you made it without the actual recipe, I salute you :)
This strawberry cake sounds and looks so delicious! Quite a few ingredients but it’s all worth it! A true French dessert!
this is just the most incredible thing i have seen in a while.. i love laduree too and often find myself inspired by their beautiful creations. you’ve done justice to the la fraise treat!
Hi Ilan
How can you say your version doesn’t look as nice as Ladurée’s?
Your version is just incredible!
and who minds the back of the pastry? What we don’t see doesn’t count :P
amazing work, you are really talented
Yeah you’re right, this cake looks like shit.
Amazing effort and you’ve definitely done justice to Laduree’s La Fraise!