I hate baking layer cakes. I am absolutely terrible at making them because I can’t frost a cake to save my life. That’s why I usually make entremets. With a pastry ring, you don’t need frosting skills. All you need are pouring skills, and I’ve got those.
There are so many pretty layer cakes all over the web, and whenever I see one it makes me sad. I just don’t get how the frosting on cakes can be so smooth when mine turn out positively awful. I’ve read countless tutorials and made lots of layer cakes over the years, but I’m never happy with how they are. Flavour wise, they’re great. The cake and the frosting are almost always delicious. The appearance? Well, that’s another story.
About a year ago, I started to think of solutions to solve my frosting dilemma. I was pretty embarrassed that I could make entremets, macarons, tarts, and soufflés, but not layer cakes! Ugh.
My first idea was making layer cakes in big pastry rings (if you’re not familiar, they’re large metallic rings) and pouring the frosting in the gap between the cake layer and the ring. I’d definitely get smooth frosting then. Alas, I was too cheap to buy a large pastry ring. I’m still too cheap for that (I just have a small one for entremets).
I realized that there was another way to solve my dilemma a couple of days ago.
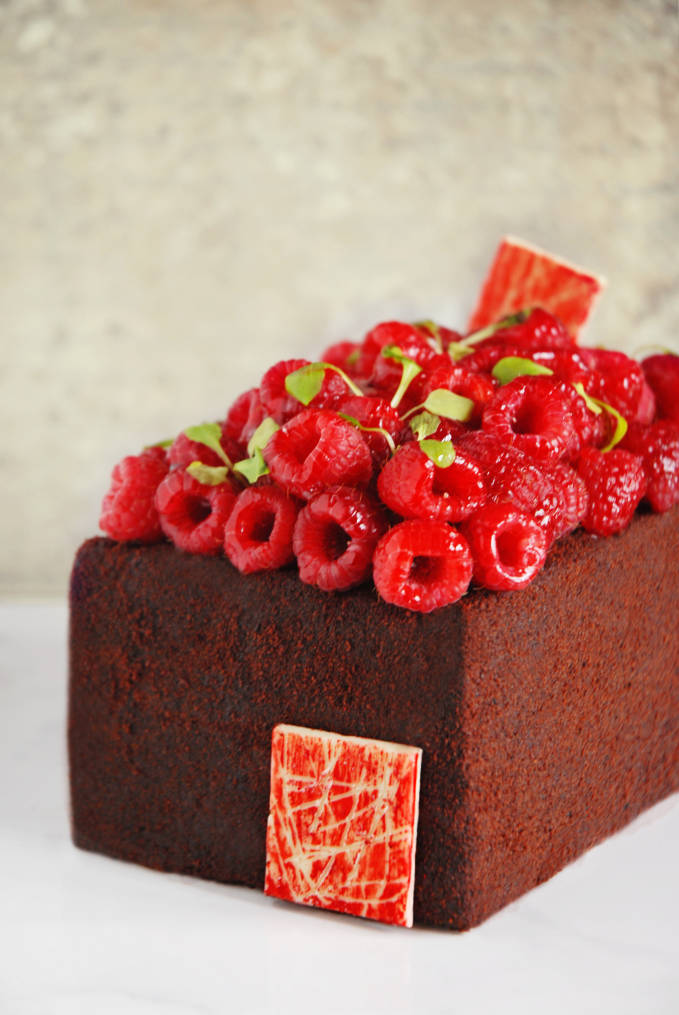
What’s my solution? Crumbs. Toasted cake crumbs. They’re not just for cake pops, folks. I’m super thankful for that—there is a limit to how many cake pops one human can tolerate.
The idea is simple: toast cake trimmings, grind them up, sift to get the fine ones, and roll a lightly frosted cake in them. No matter how ugly your frosting job was, the crumbs will cover it all up.
I got this idea from the devil’s food cake at Tartine Bakery in San Francisco (fabulous bakery by the way, I love their banana cream tarts). I was so excited when I saw their cake!
With different colours, you can get different effects. For example, you can coat a red velvet cake in bright red cake crumbs. Or a matcha cake in jade green cake crumbs. Neat idea, right? The cake crumbs can also provide a light crunch (depending on how big you grind them).
To celebrate, I decided to make cake. Well, I mean, that’s pretty obvious I hope.
I made a devil’s food cake to honour the source of the idea. I know that Tartine isn’t the first bakery to use this technique, but it was where I got the idea. I don’t think Tartine uses crumbs because they’re incapable of frosting cakes though (at least I hope not). Apparently, it’s to give the cake a darker appearance than frosting could provide. I, on the other hand, use cake crumbs because I’m incompetent.
This recipe is fairly simple. I took the devil’s food cake in the Tartine cookbook and made some modifications. For instance, I made it smaller (7” x 4”, 4 layers). I also got rid of the caramel layer because I didn’t want a very sweet cake. I wanted a very chocolate cake.
I succeeded, and you can’t even tell my frosting was a mess!
- 150g milk
- 1 teaspoon lemon juice
- 130g flour
- 20g cornstarch
- ½ teaspoon baking soda
- 1½ teaspoons baking powder
- 60g dutch-processed cocoa powder (if using regular cocoa powder, switch ½ teaspoon baking powder for baking soda)
- ½ teaspoon salt
- 120g butter, room temperature
- 180g sugar
- 3 eggs, room temperature
- 1 teaspoon vanilla extract
- 450g whipping cream
- 450g dark chocolate, chopped and in a bowl
- 50g sugar
- 50g water
- Raspberries (optional)
- Neutral glaze (optional--make by bringing 50g water, 50g sugar, 25g lemon juice, and 3g pectin to a simmer for two minutes and then cooling to room temperature)
- Microgreens (optional)
- Chocolate decorations (optional)
- Preheat the oven to 180°C (350°F). Butter and flour a quarter sheet pan, and then line with parchment paper.
- Combine the milk with the lemon juice and let stand for ten minutes (while you complete the other steps).
- In a new bowl, sift together the flour, cornstarch, baking powder (or baking soda, if using regular cocoa powder), cocoa powder, and salt.
- In a third bowl, beat the butter until light and fluffy on medium speed, slowly adding the sugar as you do.
- Beat the eggs into the butter-sugar mixture, one at a time, until combined.
- Add one-third of the flour mixture to the butter, sugar, and egg mixture. Mix until combined. Pour in half of the milk, and beat until combined. Repeat until you use all the flour and the milk (you will have three additions of the flour mixture and two of the milk).
- Beat in the vanilla extract.
- Spread the batter evenly onto the sheet pan and bake for about 15 minutes, until a toothpick inserted into the center of the cake comes out clean.
- Cut the cake into four pieces of equal size, maximizing their area (wow, that sounds like a math question). I used pieces that were 7'' x 4'', approximately. Do not discard the scraps. You will need them.
- Bring the whipping cream to a simmer, being careful that it doesn't boil.
- Pour over the dark chocolate and let stand for a few minutes to allow the chocolate to melt.
- Whisk slowly, until all the chocolate is melted and combined.
- Let the chocolate come to room temperature (about two hours).
- Beat on medium speed for three minutes, until light and fluffy.
- Bring the sugar and water to a simmer, and then let cool to room temperature.
- Place a layer of cake on a tray, and brush with simple syrup until quite wet (this will help keep the cake moist). Spread with about half a cup of frosting, and then repeat with the remaining layers.
- After placing the last layer on, coat the entire cake with frosting (reserving a bit). Don't worry if it's ugly. That's what the cake crumbs are for.
- Place in the freezer for one hour before proceeding.
- Take the reserved scraps, break them into chunks, and toast on a parchment paper-lined baking tray at 120°C (250°F) for about 45 minutes, or until hardened (but not burnt).
- Cool the scraps completely, and then grind until fine.
- Sift over a large sheet pan or tray to prepare for coating.
- Remove the cake from the freezer and coat with the bit of frosting you have left. If you don't have much left, pass a flame quickly over the cake to make the outer layer of frosting sticky.
- Pick up the cake and roll it in the cake crumbs.
- Place raspberries on top, and brush them with neutral glaze to make them shiny, if using. Add microgreens and chocolate decorations, if using, as well.
- Make sure that you serve the cake at room temperature (it takes about an hour to bring it up to room temperature from the fridge).
you amaze me…for a fellow canadian, vancouverite at heart…how do you manage to bake and study??? That is quite a talent of yours.
What a great idea and the final result is stunning. I wish I could taste your cake.
I’m the same way about cakes! I love your solution-and this cake is both pretty AND (i can tell) totally delicious!!
That’s such a clever idea and your cake is so pretty! Who knew you didn’t do layer cakes?? :)
I hate layered cakes too! Mine always look like a mess! This one is right up my alley :)
it is gorgeous!
Great idea Ilan! Looks fantastic!
Wow, that looks awesome! I love your solution to the frosting problem, very creative. I am not the best layer cake-froster either, I’ll have to try this sometime. :)
the cake looks so pretty – beautiful styling ^___^ wouldn’t have guessed that layering cakes was your kryptonite but I’m sure you’ll master it!
Wow…how beautiful is this cake! Even without or precisely because of no frosting! Love it!