Croissants aren’t bread rolls; they’re more than half butter. Croissants, with their 70+ rich and flaky layers, are a must-try item in any French bakery. Regardless, few bakeries can beat a homemade croissant. Even if cutting your croissant doesn’t reveal a cross section with a perfect honeycomb of layers, the buttery treat is sure to impress even the pickiest of eaters.
EDIT (April 1st, 2013): I originally wrote this croissant tutorial on August 13, 2012 and wasn’t completely satisfied with the results. The croissants were delicious, sure, but they weren’t perfect. The pictures were pretty embarrassing as well since the batch came out flat due to improper lamination. I also recently realized that the croissant history I shared was not accurate. My post on French croissants was actually about German croissants. Sigh. I’ve spent a while working on this recipe to significantly improve it, and that’s what this updated post now contains.
If you want to kick your croissants up a notch, you can also check out my Ispahan croissant post with instructions for raspberry, rose, and lychee croissants. You can find it here.

Croissants are made with a yeast-leavened dough that is folded with butter in a process called “lamination”. While baking, the layers of butter give off steam and cause the layers of dough to separate, leaving large gaps. The quality of a croissant can be determined by studying the size of the gaps, since large gaps are a result of proper lamination.
Croissants are often associated with their recognizable crescent shape, but not all croissants are formed into crescents. Croissants of German origin are curved into an iconic crescent shape, but French versions opt for a straighter alternative.

I tried to make this tutorial as thorough as possible because a lot of the recipes online aren’t accompanied with clear pictures and detailed instructions. If you have any questions, feel free to ask me. I’m here to help, and only expect a single croissant mailed to me per question (whether your question is answered satisfactorily or not).
This tutorial was created with information gathered from dozens of sources, but is mainly based on Sarabeth Levine’s recipe at Leites Culinaria and this post on The Fresh Loaf.

Alright, let’s get started!
Sprinkle 2 1/2 teaspoons active dry yeast over a 1/4 cup (62ml) of milk warmed to about 100°F and mix together in a large bowl. Let the mixture rest until the yeast begins to foam (about five minutes) and then mix once more. If your yeast does not foam in five minutes and your milk is the proper temperature, throw out the mixture and try again. If it still doesn’t work, then you need to buy new yeast. This recipe will not work if your yeast does not foam. Pour in 1/4 cup (50g) sugar and 3/4 cup (188ml) cold milk.
If you don’t have a lot of experience with bread baking (or microbiology), the reason yeast is put into warm milk is because milk has a natural sugar in it called lactose (formed from galactose and glucose) that feeds the yeast. The milk is warm to stimulate yeast activity.
Sift 3 cups (375g) all-purpose flour into a separate bowl. Originally, I recommended using a combination of pastry flour and bread flour. Some recipes call for just bread flour. Each type of flour has its pros and cons for croissants. The higher the protein content of the flour (e.g. a high protein content flour is bread flour), the more stable your honeycomb gaps inside the croissant will be. However, a dough made from a high-protein flour is very difficult to roll out. Applying lots of pressure to the dough will cause the butter layers to merge with the dough layers and prevent the honeycomb from even forming. I found that using an all-purpose flour (medium protein content) is best.
Add two cups of the flour and 1 teaspoon fine sea salt to the yeast mixture. Stir and add as much of the remaining flour as necessary until the dough is soft and sticky.

You want the dough to look like the dough in the picture below. Avoid over mixing as the dough will absorb more flour when it is kneaded and will end up being very dry.

Take the dough and put it on your floured work surface. Knead the dough so that it has a smooth surface and forms a ball that flattens slightly as it stands. Do not knead excessively. A minute or two is enough.
Take this ball, put it on a plate dusted with flour, and cut an X into the dough to split it into four quadrants. The cut should be about one inch deep. This cut will relax the gluten linkages in the dough. Relaxing the gluten is important to ensure the dough is not too difficult to roll out. You only want strong gluten linkages at the end of the entire recipe. If your gluten is too strong too early then your croissants will not have those iconic gaps because the butter will be forced into the dough during rolling.
Sprinkle the top with a little bit of flour and refrigerate for an hour.
Now it’s time for my favourite part: butter.

There’s a lot of it. You want 210g, or one cup, of butter. Take it out of the fridge and let it sit for about five minutes just so that it’s slightly softer, but do not soften it completely. Beat this butter until it is almost smooth.

Add 2 tablespoons of flour and beat for a little while longer until the flour is incorporated. What we’re making is called beurrage, or the block of butter – yup, a block – that is used in puff pastry or croissant dough. The French seem to have a word for everything. Worried that the butter is fattening? Don’t worry, it is. In fact, there is so much butter in this recipe that we have to make a shape out of it. You want to make a square of butter, about 4 inches wide (10cm), on a floured work surface.

Then wash your hands, because they’re probably all buttery. Or lick them clean if you really like butter. Place the beurrage in the refrigerator to chill with the dough until they are both of equal consistency. This is very important. They must be of equal consistency or the dough will be incredibly difficult to roll out correctly. Note: this does not mean the same temperature, but rather the same “hardness”.
It’s important to always be working with cold dough and beurrage. If you ever think that it’s not cold enough, and even if the instructions don’t specifically tell you to, put it in the fridge to chill. Seriously. Please do this. I’ve ruined a few batches by not chilling long enough.
, ready for the fridge")
The dough that we made is called detrempe, a French word meaning the dough used in lamination. Take the dough and put it down on your floured work surface so that the tips of the X you made are at approximately 2, 4, 7, and 10’o clock positions. It should now look like four quadrants of dough at the north, east, south, and west positions. Dust the dough with flour and using the heel of your hand press each quadrant away, flattening and stretching it about 2 1/2 inches (6cm), making sure that the center square of the “clover” is thicker than the “leaves”.

Roll each cloverleaf with a rolling pin until it is about six inches long and five inches wide, still leaving a raised square in the middle. Your goal here is to roll the leaves thin enough so that their combined thickness is equal to the thickness of the center square.

Just so you don’t forget there’s supposed to be a square there, why don’t you just press down on the sides of the square with your rolling pin to mark it. Alright, here’s where it gets fun. Place the beurrage onto the square you just made.
 on the clover-leaf shaped detrempe (puff pastry or croissant dough)")
Take the flap, or leaf, of dough that is furthest away from you and fold it onto the butter. Take the flap that is nearest you and do the same. Continue with the other two flaps, until you have a square piece of dough.
 over the beurrage (butter and flour block)")
Alright, now it’s time to take out some of your rage. But not a lot, because the dough is delicate. Take your rolling pin and lightly hit the dough a few times to distribute the butter in it.
")
Now’s the point where we begin to count the number of layers in this dough, just for interest’s sake. Right now we have three layers already. The dough at the bottom, the butter, and the dough at the top (the four cloverleafs merged together, essentially). Roll the dough into a 17 by 9 inch (43cm by 23cm) rectangle and cut away a few millimeters from each side to reveal the butter. If you don’t see butter, cut away more until you do. Make sure to repeat cutting away a little bit of dough for every fold to ensure there aren’t areas of the dough where layers of butter are missing. Also, never put the cut away dough back into the main dough as it will ruin the lamination. Note: I didn’t cut away any dough in the pictures below and that batch did not turn out as well as the others where I did.

Fold the dough like a business letter. If you’ve never folded a business letter before, fold it like a regular letter. If you’re still confused, and that lame joke that I now realize isn’t remotely funny did not help, you want to fold the left third of the dough into the center, and then the right third of the dough onto the left. This way, you should end up with a rectangle that is about 6 inches wide by 9 inches high (14cm by 23cm).
After folding, take the rolling pin and lightly roll it over the dough to press the layers together and then refrigerate everything for one hour, and then place the dough in the freezer for half an hour. Whenever you roll out the dough, from this point on, be very gentle to prevent the butter from being forced into the dough and destroying your lamination. You have just completed a single turn, which is done by folding the dough like a business letter. We will be doing another single turn later. At current count we have seven layers since the dough between folds merges together eventually.

Place the dough onto your work surface with the long open seam (the place where the layers of dough are visible) facing you. In the photo above you can see that the closed seam is facing away from me, and therefore the open seam is facing towards me. Roll out the dough into another 17 by 9 inch (43cm by 23cm) rectangle to prepare to do a book turn. Remember to cut away some dough!
A book turn, also called a double turn, is much more interesting than folding the dough like a business letter. Fold the short right edge of the dough 2 inches (5cm) to the left (this is the spine of the “book”). Then, fold the short left edge of the dough to the right to meet (but not overlap) the right edge (this is the pages of the “book”). After that, fold the dough from left to right. Do you see how these instructions can be confusing? It’s easier to see why it’s called a book turn in real life (but you can also look at the picture below).
Using your rolling pin, gently roll over the layers to compress them together. Place the dough in the fridge to chill for another hour, and then place in the freezer for thirty minutes. Before folding the dough from left to right we have thirteen layers. After folding it together (to complete the book) there are twenty five layers of dough and butter.

When you take the dough out of the fridge roll it into another 17 by 9 inch (43cm by 23cm) rectangle and do another single turn of the dough (fold it like a business letter) after cutting away some dough. Compress the layers slightly using your rolling pin. At this point we have 73 layers of beurrage and detrempe. Magnifique!
Wrap the dough in plastic wrap and let rest in the fridge for at least six hours, and then place in the freezer for thirty minutes.
Roll the dough into a rectangle 9 inches high by however much you can wide. Use a knife to cut off any uneven parts so that the dough is perfectly rectangular. Mark points 4 inches apart on the bottom of the rectangle, and then 4 inches apart on the top of the rectangle starting 2 inches away from the edge. Cut along these points to create triangles. Your first and last triangle will be smaller than the others. Place all triangles in the fridge to chill for thirty minutes.

Take one of the triangles that was not from the ends and hold it in your hands. Stretch the base of the triangle so that it is about 5 inches (13cm) wide. Then, stretch the triangle until it is about 11 inches (28cm) long. For the half triangles at the ends, combine them by overlapping them slightly and pressing together. Then, stretch them like the regular triangles.

Put the triangle back on the work surface. This is your opportunity to fill your croissant with anything you desire by placing it at the base of the croissant. Be careful to not overfill, two teaspoons of filling is enough. Fill with Nutella, perhaps, for Nutella croissants? Pear and blue cheese? Ham and cheese? Cheese?

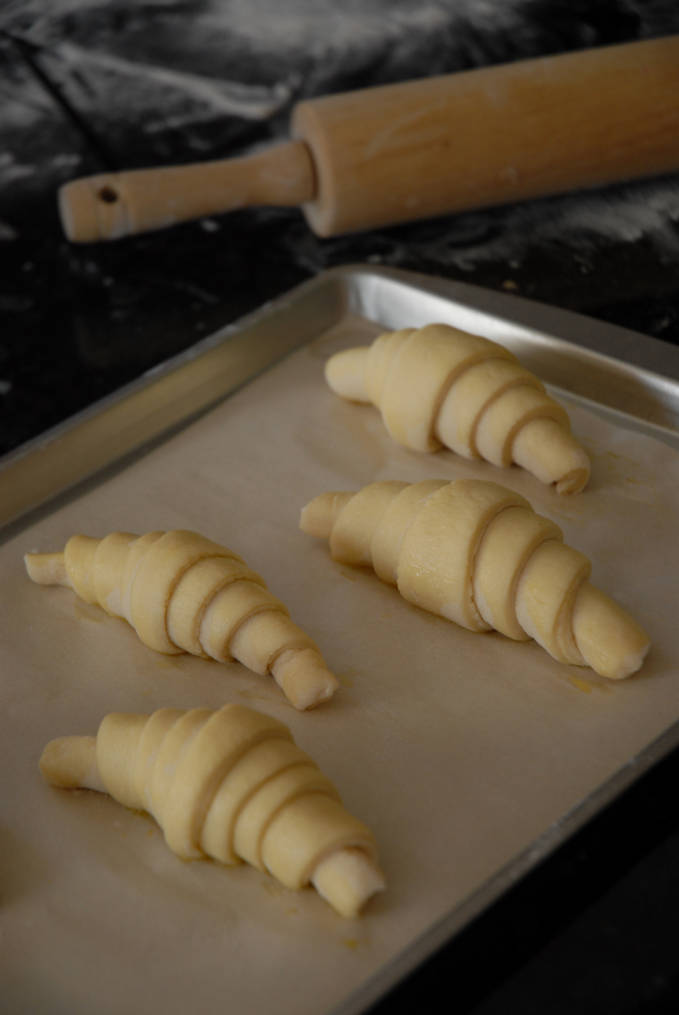
Starting from the base of triangle, roll it up to the tip. That’s all you need to do to make a straight, French croissant. As you roll, try to stretch the dough slightly. Your goal is to have seven “steps”, caused by three full rolls of the dough.

Continue rolling the other triangles and place them about 2 inches (5cm) apart on a parchment-lined baking sheet with the tip of the croissant at the bottom so that it doesn’t unravel. Brush the croissants with egg wash (an egg beaten with a teaspoon of water).
To proof the croissants leave them at room temperature for a few hours until they are doubled in size. I had to leave mine out for about four hours. Do not, under any circumstances, use the proof setting on the oven as your butter will melt.
Preheat your oven to 375°F (190°C). Lightly brush the croissants again with egg wash (double egg washing helps them develop a nice crispy exterior). Bake for about 25 minutes.

Once they finish baking, they won’t last for long. Homemade bread is impossible to resist, and homemade bread with 73 alternating layers of butter and dough? Even harder.

Trust me, when these come out of the oven you’ll be glad you didn’t buy a dozen at the store.
- 2½ teaspoons active dry yeast
- ¼ cup (62.5ml) + ¾ (187.5ml) cups milk
- ¼ cup (50g) sugar
- 3 cups (375g) all-purpose flour
- 1 teaspoon fine sea salt
- 1 cup (210g) cold butter
- 2 tablespoons (16g) all-purpose flour
- 1 egg
- 1 teaspoon water
- Warm the ¼ cup of milk to about 38°C (100°F) and then sprinkle the yeast over it. Stir together and wait five minutes for the yeast to activate.
- Pour in the sugar and the rest of the milk, which should be cold.
- Sift the flour into a separate bowl and then add two cups of the flour and the salt to the yeast mixture. Stir and add as much of the remaining flour as necessary until the dough is soft and sticky.
- Transfer the dough to a floured work surface and knead a minute or two until the dough has a smooth surface and forms a ball that flattens slightly as it stands.
- Move the ball of dough to a plate dusted with flour, and cut a deep X into the dough to split it into four quadrants. Sprinkle the top of the dough with a little bit of flour, and let rest in the fridge for at least an hour (I sometimes leave it for up to a day).
- Beat the butter until it is smooth and then beat in the flour.
- Place the butter on a lightly floured work surface and shape it into a square approximately 10cm (4 inches) large.
- Wrap the butter in plastic wrap and place in the fridge until the beurrage block and detrempe dough are equally hard (press on each one to check).
- Place the detrempe on a lightly floured work surface such that the tips of the X you cut are at approximately the 2, 4, 7, and 10′o clock positions. It should now look like four quadrants of dough at the north, east, south, and west positions.
- Using the heel of your hand press each quadrant away, flattening and stretching it about 2½ inches (6cm). Make sure that the center square of the “clover” is thicker than the “leaves”.
- Roll each cloverleaf with a rolling pin until it is about six inches long and five inches wide, still leaving a raised square in the middle. Your goal here is to roll the leaves thin enough so that their combined thickness is equal to the thickness of the center square.
- Place the beurrage onto the square you just made.
- Take the flap, or leaf, of dough that is furthest away from you and fold it onto the butter. Take the flap that is nearest you and do the same. Continue with the other two flaps, until you have a square piece of dough.
- Take your rolling pin and lightly hit the dough a few times to distribute the butter in it.
- Roll the dough into a 17 by 9 inch (43cm by 23cm) rectangle and cut away a few millimeters from each side to reveal the butter. If you don’t see butter, cut away more until you do. Make sure to repeat cutting away a little bit of dough for every fold to ensure there aren’t areas of the dough where layers of butter are missing. Also, never put the cut away dough back into the main dough as it will ruin the lamination.
- Complete a single turn of the dough by folding the left third of the dough into the center, and then the right third of the dough onto the left. This way, you should end up with a rectangle that is about 6 inches wide by 9 inches high (14cm by 23cm).
- After folding, take the rolling pin and lightly roll it over the dough to press the layers together and then refrigerate everything for at least one hour, and then place the dough in the freezer for half an hour.
- Roll out the dough into another 17 by 9 inch (43cm by 23cm) rectangle to prepare to do a book turn. Remember to cut away some dough!
- Complete a book turn of the dough by folding the short right edge of the dough 2 inches (5cm) to the left (this is the spine of the “book”). Then, fold the short left edge of the dough to the right to meet (but not overlap) the right edge (this is the pages of the “book”). After that, fold the dough from left to right so that it lines up.
- Using your rolling pin, gently roll over the layers to compress them together. Place the dough in the fridge to chill for at least another hour, and then place in the freezer for thirty minutes.
- When you take the dough out of the fridge roll it into another 17 by 9 inch (43cm by 23cm) rectangle and do another single turn of the dough after cutting away some dough. Compress the layers slightly using your rolling pin.
- Wrap the dough in plastic wrap and let rest in the fridge for at least six hours, and then place in the freezer for thirty minutes.
- Roll the dough into a rectangle 9 inches high by however much you can wide. Use a knife to cut off any uneven parts so that the dough is perfectly rectangular. Mark points 4 inches apart on the bottom of the rectangle, and then 4 inches apart on the top of the rectangle starting 2 inches away from the edge. Cut along these points to create triangles. Your first and last triangle will be smaller than the others. Place all triangles in the fridge to chill for thirty minutes.
- Take one of the triangles that was not from the ends and hold it in your hands. Stretch the base of the triangle so that it is about 5 inches (13cm) wide. Then, stretch the triangle until it is about 11 inches (28cm) long. For the half triangles at the ends, combine them by overlapping them slightly and pressing together. Then, stretch them like the regular triangles.
- Starting from the base of triangle, roll it up to the tip. That’s all you need to do to make a straight, French croissant. As you roll, try to stretch the dough slightly. Your goal is to have seven “steps”, caused by three full rolls of the dough.
- Continue rolling the other triangles and place them about 2 inches (5cm) apart on a parchment-lined baking sheet with the tip of the croissant at the bottom so that it doesn’t unravel.
- Brush the croissants with egg wash (an egg beaten with a teaspoon of water).
- To proof the croissants leave them at room temperature for a few hours until they are doubled in size.
- Preheat your oven to 375°F (190°C). Lightly brush the croissants again with egg wash (double egg washing helps them develop a nice crispy exterior). Bake for about 15-25 minutes, or until the croissants aregolden brown.
Liked this tutorial? Read another one!
You beauty! This is probably the best croissant tutorial I’ve seen.
My favourite parts are the fabulous tutorial photos, and all the butter! Though, seriously, those are some professional looking croissants.
That is the best croissant tutorial I’ve seen. Very thorough, and the pictures are great! I just couldn’t take the wait! Your croissants look great though! :D
These look fabulous, especially with the nutella! Your tutorial was very thorough and there were lots of pictures which is great! I will definitely have to make these!
Great illustration of how to make the croissants. They look fantastic.
Wow! Best tutorial ever! I can’t see myself making these often (like maybe once a lifetime) but I’m determined to try now :)
You’re the best! I finally know how EXACTLY it should be done like, thanks :) And your croissants look really deliciuos ;)
Wow.. very detailed and helpful
Picture perfect.. Bookmarking this
Thanks for stopping my blog and leaving me such a lovely comment. Love your step by step instructions on how to make a croissant. I may just have to take the plunge and try making them. Keep up the good work. Lovely blog!
Oh, I almost forgot. I read your post about how you had an interview and was pretty much offered the job. From my experience when I was trying to get an internship, persistance pays off. I had to “beg” for almost a full year to get my internship. They like to know that you really really want the job.
Wow, I’m so impressed! Never thought about making homemade croissants before…but it doesn’t look too hard. :)
such amazing instruction – thank you so very much! these look incredible – france would be proud!
xo
Fantastic step by step guide, I’m definitely going to give these a go. Probably shouldn’t have read this at breakfast time, I am indeed salivating!
These have been on my bucket list for so long. I was wondering if there is any reason I can not/should not make a half-batch? I would like to give it a trial-run before I get into such a large amount. I make all kinds of bread and rolls, but for some reason I am very inhibited by croissants.
The only problem I can think of is that if you roll out the dough to the proper dimensions it might be too thin and rip and if you place dough over it to fix it the layers are no longer intact. The full batch only makes about 20 mini croissants anyway. Let me know how it goes!
you are so welcome for the shout out on my blog.
i’m just so happy i found you!
do you know that croissants are my weakness?
just like izaac mizrahi says “just to go to paris for the espresso and a croissant is really all i need”
right?
I found your blog through a snarky comment you made on another blog ( which I found quite funny) and now I am checking out your blog. Which I love. Are you really 16? Quite impressive work for being so young – I am sure we will see you on Iron Chef one day. Love the KWAH-sant tutorial. These are on my baking bucket list. I will now go sign up for your blog emails/Rss feed. Good stuff you have here
Oh yummy! I have dreamed of making chocolate croissants since I first watched the movie, It’s Complicated! Delicious!!
Wouw, just wouw.
Thank you for the very thorough explanation and pictures. I have been dying to make croissants and, with your tutorial , I now feel ready to take the leap. Thank you.
What a great tutorial on the croissant. I made some last year, it was one of those bucket list things, doubt I will make them ever again.
I just found your tutorial via Leite’s Culinaria. Thank you so much for the turorial….I am very visual and this is going to help me to try something I have always wanted to do!
I made these yesterday and they came out fantastic! One question, if I don’t want to bake all the croissants at once can I put them back in the fridge after they’ve proofed so I can bake them fresh over the next few mornings?
thanks!
I think it’s best to avoid doing that since they may overproof, even in the fridge. I haven’t tried it myself though, so if you do try it out let me know if it worked please! :)
You can always freeze croissants before proofing. When you are ready to eat them take them out of the freezer, thaw, proof, and bake.
Great tutorial but I have to say how worried I am about the comments…
I am almost certain that only one person has had a go at making the croissants…typical of too many North American sites open to comments…is the kind of commentary that runs: Oooh, lovely…that looks great…wish I had the time/courage/energy to try and make these. This is a problem as it trivialises the hard work you have put in to this and the commentry is treating this as ‘food porn’ – ah, oh!
What are you doing people? Go out and make them if you think you might like them – and then make a comment.
Mike
Thank you!! Yes. Make them and then comment!
Hi there! Thank you for adding pictures!:)
One question though, can I substitute active dry yeast with instant yeast?
You definitely can. Use 2 1/4 teaspoons of instant yeast but don’t let it proof in the warm milk. Just add the yeast in with the flour and then add in the milk.
Thanks! I’ll try making them tonight.:)
great pictures and tutorial. terrible croissant….
they look so technically flawed on so many levels….
i’ve made hundreds of batches in my life time and i would be embarrassed if one of my batches turned out like that.
google: “poolish croissant” to see what a proper croissant and respect for baking looks like.
yes, the overall, general procedure is correct, but the execution and final product is shockingly bad. don’t use his pics as a benchmark for success.
Hi, I’d like to thank you for your comment. To be perfectly honest, when I first read it, I was quite upset. Your comment made me realize, however, what my mistakes were and put me on the right track to fixing them. I’ve spent a while working on these because of you and they are truly so much better than the original. Thank you!
No kidding! If I had received such a comment, I would have been upset! How dare ANYONE say ‘terrible croissants’ without tasting them. They look perfectly adequate to me (in fact, very appetising) and that’s from a French person, so to DDarko, please keep your opinion to yourself. If you can’t say anything nice, don’t say anything at all. It’s ok to suggest and encourage, it’s another to criticise to make oneself look ‘bigger and cleverer’. IMO, counting the number of ‘rolls’ on a croissant is NOT (I repeat, I’m French!!) authentic AT ALL. If you think it looks better, then that’s fine, but those here look perfect to me. After all (and on this, we can only comment if we made them ourselves) it’s more in the taste than the look of it that it needs to be judged.
I pretty much want to reach through the screen and grab one. Or three. I also have these on my culinary bucket list and thanks to your amazing tutorial – I have confidence mine will come good!! Thanks Ilan!
Ilan you have inspired be to give croissants another go. It has been a while since I attempted some. Practice does make a better product. Great Photos!
They look great Ilan! One day I will attempt them….maybe when I don’t have any little kids running around beside me! :)
Thank you for the gorgeous tutorial and all the excellent advice – and the bad jokes. :P
Can you tell me what is the yield on this recipe?
Sure, no problem. About a dozen croissants.
These are beautiful! I make croissants sometimes, and I use James Petersons recipe.
Btw. Have you seen James Petersons “Baking” book? It’s a stunning book, and he has a lot of helpful theory in it.
I just wanted to say that I never had a problem with your old method. My croissants always turned out big, beautiful, and fluffy! I did notice that the croissants in your old pics were a bit flat, but I always chalked it up to a minor error on your part and not in your instructions. I’m trying the changes you made and I’m excited to see how they turn out. Thanks so much for the wonderful tutorial!
Hi Sugi, thanks so much! Please let me know how you like this one in comparison.
Well the jury is in on this one and I like this updated method! The croissants were simply perfect! Thanks again Ilan, I’ll be sure to check out more of your bologna. :)
Hahahaahaha autocorrect changed blog to bologna! >_<
Happy you liked them!
IIan, I am here from the Listserve. I have always wanted to try to make croissants. I was already sold to try your tutorial here, then I scrolled to the photo where you spread chocolate in one, and I’m in love! I’ll let you know how mine turn out.
In the final result, do the croissant’s turn out sweet sans any filling??
If I want my croissant’s to be savoury, how do I alter the recipe?
tnx a lot
nd btw really great pics :D
Hi Monica, no, they do not turn out sweet. If you want the croissants to be savoury, use a savoury filling before rolling them up.
Hey Ilan, I wanted to ask out of curiousity; how come that you recommend folding the dough like you did (turning it every so often).
I also wont be able to beat the butter but I am going to have to see how hard its will be to do it with a thinly cut square of butter (hit with the rolling pin)
Cheers
Folding the dough is necessary to create the layers in the croissant. Different folds create different amounts of layers, and some are just fun to do (like the book fold). I recommend beating the butter because that way you can incorporate flour into it and it is less likely to melt in later stages, but if you can’t make sure you flour it well.
Thanks for your reply. Now I am almost done, just about to roll the croissants but unfortunately I might just be able to leave them out for four hours to proof and thats it. After that they will have to wait for 12h.
Do you think that might be a problem? Or is it better to let them proof the next day and just put the rolled ones in the fridge?
It might be too late now, but I think you should put the rolled ones in the fridge and let them proof in the morning.
So I ended up having a whole different problem…
Turns out that (my french isn’t that great) ‘Levure chemise’ is not yeast (which I thought it would be, since levure = yeast) in some sort of dried form or instant form but instead simple baking powder…
They were still ok but nothing more :) However my proofing problem solved itself.
Oh yeah, using baking powder instead of yeast is a big problem. You should try making the croissants with yeast; I’m sure you’ll notice a big difference. I’m curious how you saw the milk bubble after you added the baking powder.
I just used this tutorial for my first attempt at croissants and the results were amazing. Thanks so much!
I just have my croissants on the last rise before going into the oven and I was wondering if at this point they could go into the fridge overnight to be baked in the morning?
This is for future reference as I would love to be able to have them fresh for breakfast some time and they are a bit too labour intensive to do that.
Thanks,
Rm
Hi Rosemary, sorry for the late reply! After rolling you can put your croissants in the fridge overnight and let them come to room temperature/finish rising in the morning. How were they? :)
Your croissants look good. But no tutorial on making croissants is complete without a photo of their insides (vertical cross-section) since this is the true test of technique. I’ve eaten (and made!) too many croissants that look good but fail to deliver on structure. So come on, no hiding in future. Great blog, by the way. I like your approach. :)
Hey Pete! Yes, you’re completely right. Next time I make these I will take a photo :) Thank you!
hi! am attempting to make croissants this week again aft a not so successful first attempt last year and stumbled upon your blog again! ha seriously, you have tons of great stuff here. can i check – so what do you do with all the excess dough you cut out while rolling and folding? thanks!
Welcome back :)
The excess dough that is cut off can’t be used for making croissants. You can bake it with cinnamon and sugar though and it should be pretty good. You won’t see much layering with it.
Great recipe
Thanks so much for this great tutorial! I made these a little while ago, and am going to make them for Thanksgiving…they were requested of me! In fact, it was more like…if you don’t bring those croissants then you can’t come to Thanksgiving :) so wish me luck the 2nd time and thanks again for all the time and effort that when into this detailed recipe!
Thanks for this wonderful tutorial!!
I can’t thank you enough for such a great tutorial and an awesome recipe. I tried these today came out very well .my husband and son loved it.thank you so much.only one problem I had was, the chocolate stuffing kept oozing out in spite of sealing the edges.can you please suggest how to prevent it?
Hi Sandhya! Glad you enjoyed them. Try, perhaps, using an egg wash as glue to seal the edges. On the other hand, who can say no to oozing chocolate? :)
Hello, I want to make croissants forever and was wondering how many croissants do this recipe make!
Thanks,
Sophia
Hi, about a dozen!
Hello I wanted to ask a few questions while my croissant dough I rising. Can you leave the dough in the refrigerator all night? Does it have to be refrigerated for 6 hours? Thanks Sophia
Hi Sophia, sorry but I haven’t tried! Let me know if you do and how it works out please.
I use this to make this recipe every month, I double it. I freeze them and every Saturday night set them out to rise for the most wonderful Sunday morning breakfast. Thank you for taking the time to create this post. I may never get to Paris. But every Sunday I feel closer to getting there.
Does it matter if I use salted or unsalted butter? I’m going to try making these this weekend and I want to make sure I have all the right ingredients!
Hi,
I just finished rolling the butter into the flour nd i accidently made the ‘4 clover leaves ‘ thicker nd d butter started to ooze out in certain parts….
I’ve kept in the fridge now….how do i proceed???? Pls don’t tell me i have to start all over…..
…would love to be doing the first book turn right now, but I’m currently waiting for my dough to unthaw after taking it out of the freezer for the thirty minutes as instructed.
The most delicious croissants ever!!! My family LOVES them! Thank you for the recipe and the detailed description! Here is how they turned out with me: http://easypeasydishes.blogspot.com/2014/05/blog-post_15.html
Not as beautiful as your, but yet veeeeeeeeeery yummy!
Best,
Dayana :)
Hi! I made these croissants yesterday and they turned out fabulous! The only issue is that they are quite labor intensive. I am needing to make them in bulk and was wondering if I could freeze the dough at any point in order to make however many I need for the day. If so, when is the best time to freeze? i.e. before cutting and forming, after they are formed, after they proof, etc. I just don’t want to kill the yeast. Thanks for the great recipe and tutorial!!
Hmm, honestly I’m not sure as I haven’t done this myself.
I realize this is not a recent thread, but I just came across your recipe and decided to try it out.
I am a French American and the previous owner of a French bakery so naturally I have made many, many croissants. I made your croissants yesterday and baked them for breakfast. I must say, these croissants may be the best I have ever made! There isn’t really much different about your recipe, other than the added step of placing the dough in the freezer a few times, but I believe that step REALLY held the butter together for a very light and airy, as well as quite a crispy croissant!! BEAUTIFUL! I will use your recipe as my staple.
Thank you!
Hi!
I have a question. So, I’ve tried a couple of times to makes these crazy things, and I think I have an idea where the trouble is coming from, but I wanted to ask anyways.
So, when I’ve been rolling out the dough the first time and each time after, I can clearly see lumps of butter spread out sporadically through the dough. Like big chunky lumps, and they’ll poke through the edges and everything. It doesn’t look very pretty.
Then, when I go to bake them, all the butter leaks out and I end up with icky croissants that are dense and icky and though and icky.
I have a feeling it’s because the dough and the butter are not the same “hardness” when I roll them out the first time… But that’s why I’m here.
Yes, exactly!
Can I make this with instant yeast instead of active dry?
Hi, i am in the (very long) process of making these.. One concern i have, is that the butter seems to be seperating into chunks between the dough whenever i roll it… Is this something to worry about? First time making these, so I’ve read the instructions over and over and am still not sure if I’m doing things correctly :)
Thanks!
Hi it sounds like your butter might be too cold. The goal is for it to be the same hardness as the dough.
Would I need to make any adjustments for altitude? I’m in Denver, CO, tried making them today. They didn’t double in size when proofing and the bottoms burned, while middles were still undercooked when baking at 375 F for 23 minutes.
If you usually make adjustments for altitude, probably. I live near sea level so I’m not really sure. Perhaps your yeast was expired?
Thank you so much for doing such a wonderful and perfectly executed job on this tutorial. I am a private chef and constantly learning via interwebs and making my own croissants made my employer extremely happy.
Probably operator error but they are not rising, what would cause that??
Improper folding (lamination) or insufficient cooling in between folds. Both result in the butter layers disappearing and thus not rising. Another possibility is the yeast is too old (dead).
I just made these today. WOW! They are so, no let me say it right, soooooooo good! Thank you for the fantastic detailed instructions. It couldn’t have been explained any easier. I filled some with Nutella and those turned out to be my personal favorite. As for the pain ones I’ll probably try to make them a little less sweet next time.
Thanks again!
Thank you so much for the tutorial, thank you for your willingness to share…making croissant from scratch was my obsession , even though most of the times i failed miserably (ripping the bread dough while laminating with butter…always)…i think by following truly to your tutorial might give satisfaction result [@_@]